Monday, June 16, 2014

Teacher Gift Troubles?

Anyone in the same boat as me?  Having trouble putting together an end-of-the-year gift for all those much loved teachers?

I really adore my kids' teachers and I want to be able to thank them appropriately for all their hard work.  I just couldn't handle going to one of my old stand-by gifts this time around.  Nothing says, "Thanks for all your dedication" like a candle or antibacterial soap...blahhhhh!  I had to get out of my rut!!!

I decided to take a quick spin around the Christmas Tree Shop (and when I say quick, I mean two crabby kids in tow and an ice cream cake turning into soup in the car).   Well, I scored!!!!  I found these adorable printed pitchers, picnic sets, napkins, and hot dog and hamburger holders.  I threw in some ice tea K-Cups and mini paper umbrellas and Ta-da!  We are set!

As you can see by the price tags (don't worry, I removed them) this was not a pricey gift by any means.  By my calculations, each gift cost about $7.00.  Also, it works for both male and female teachers.


It's like a picnic in a pitcher!  How cute!!


And, guess what?!?!  I don't even need a gift bag!  Just throw on some ribbon and a gift tag and it's complete ;)


Any great suggestions?  Let's hear them!


Thursday, June 12, 2014

Mo Summer, No Problems!!


If you're anything like me, you have mixed emotions about summer break.  Don't get me wrong, I love having all three gremlins cherubs home 24/7, but its quite a bit of work!  Mine seem to require constant stimulation, always needing to be wow'd with new and exciting activities.  I'm trying, really I am!

Here are a few of my tips for making summertime run a bit smoother.  Anything helps, right?

1.) Scour all your local websites for free or low cost events.  We're talking malls, libraries, parks and recreation, townships, movie theaters...ANYWHERE!  You'll be pleased with what you find, $1 movies, free outdoor movie nights, story times, etc.  I take out my calendar in late spring and start filling it up.  It feels good to see those little squares full with activities ;)

2.) Emily and I both keep a small convenient store in our cars.  It seems as if these little boogers are constantly "starrrrrrving."  It doesn't matter if we've just eaten a meal, if they see, smell, and even hear the sound of a food wrapper, they're instantly hungry.  Keeping non-perishable snacks and drinks in our car drastically cuts down on costs, especially when you're visiting an amusement park.

3.) I keep a basket in our laundry room of beach towels and bathing suits.  The fellas love water activities, especially our inflatable water "oasis."  It's great that they enjoy outdoor activities, but on a warm day they are in and out at least 3 times.  Keeping a stash downstairs keeps me from running up and down the stairs a million times (not that I couldn't use the exercise).

4.) Keep a bottle of sunblock here, there, and everywhere.  I keep some in my purse, car, and in my laundry room.  It's a great reminder to always slather it on the kiddies.  Plus, you never know when the mood will strike you for outdoor fun.

5.) Ask teachers for summer work to cut down on "summer slack."  I also pick up workbooks at the dollar store to supplement.  I make sure to set aside a half an hour 5 days a week for the boys to do school work.  At first they complain (no surprise), but eventually it becomes routine.

6.) I try to set aside an envelope of "Summer Fun" money.  Our neighborhood has a yard sale in the spring.  Any money I make from the sale goes into an envelope to use towards summer activities.  Having this money set aside helps me with budgeting.  Before heading off to an event I estimate how much we'll need.  This alleviates over-spending on food, souvenirs, etc.

Any tips?  Please share!

Here's to a HAPPY and low stress summer ;)


Sunday, February 23, 2014

Get Better Soup

Things have been really gross around our house for the past week. I've dealt with a plethora of bodily fluids from my kids this week and our entire house needs Lysol'd. So, if you've missed hearing from me.....and I know you have ;).....that's why.

As I mentioned the last time you and I chatted, I'm using this time to brainstorm. While I love imagining new projects around the house, I've mainly been thinking up and testing new recipes. Here is my $3 "Get Better Soup" recipe that can feed your entire family.  It's soooo good!  

Keep this in mind before getting your ingredients together....  The amount of ingredients I'm calling for is because I made this for lunch. However, you can easily make this for dinner and just add two extra potatoes, carrots, celery, and more meat. 

Ingredients you'll need:

Two russet potatoes - peeled and cubed
Two large carrots - peeled and diced
One large parsnip - peeled and diced
Two celery stalks - diced


Before you begin chopping your veggies, add about twelve cups of water to a stockpot and bring to a boil. Then add 4 beef or chicken bouillon cubes. After a ton of testing out bouillon, I swear by the Knorr brand. 


If you use a different brand of bouillon you'll probably need to add a bit more because they may be a smaller size than Knorr's. 

Next ingredients:

One cup of chopped beef or chicken - this doesn't have to be added, but if you have some leftover from the night before, by all means, add it. :)


1/2 lb pasta - I used farfalle, but only because that's what I had on hand. If you have rotini, egg noodles, macaroni, etc., feel free to use it. 

Preparation:

Here's the deal with how easy this is to cook. Once the water is boiling and the bouillon is dropped in the water, add all of your veggies and meat, if you're adding meat. Let it cook at a boil for about ten minutes. 

In the meantime, cook your pasta in a separate pot according to the directions on the box.  Are you wondering why I cook the pasta in a different pot?  To me, if you cook the pasta in the soup it gets too starchy and tastes more like a gravy-ish soup.  Gravy-ish isn't a real word?  Well, it should be.  :) 

Once everything is cooked, add some pasta to your bowls then ladle some of your delicious broth and veggies over the pasta. 


Taste it quick. Do you like it?!?  


Wednesday, February 19, 2014

Brainstorming - Our New 1930s Sideboard

I had many dreams for this past weekend and this week, but my kiddos aren't feeling well. Instead of freaking out about not accomplishing anything (and I literally mean anything.....you would cringe at the thought of stepping foot in our house right now) I decided to change my focus. This week I'm going to brainstorm. I'm looking at areas of the house that need improvement in whatever way and jotting down ideas. Although I'm normally very decisive about everything, I need YOUR help with something. 

See this gorgeous piece of 1930s Americana furniture?  


What....you don't think it's beautiful?  You will. At the end of this process, this $30...YES, $30....piece of Habitat for Humanity ReStore furniture will be Gone with the Wind fabulous. (If you don't watch Real Housewives of Atlanta you won't get that, but if you want a good laugh Google "Kenya Moore Gone with the Wind Fabulous".)

Before all of this transforming can begin I need your help. Taking my current wall color into consideration, what color do you think I should paint the sideboard?  I'd love and appreciate your thoughts in the comments below. 

Thanks so much for taking a moment to comment!  :)


Saturday, February 15, 2014

DIH Construction Party


So, my little guy recently turned 3 and insisted on a construction party.  While I enjoy his newly found independence, unfortunately, I no longer have control over the party theme (sigh). 

I like to put my personal touch on every party so I rarely run to the party store for decorations.  I like a challenge ;)  I also keep my budget really tight so I buy as many items from the dollar store as possible, like the paper goods and utensils, and then fill in as needed. 


For the personal touches I headed to my local craft store.  I lucked out and their scrapbooking paper was on sale for 3/$0.99.  I grabbed 6 pieces (which was more than enough) to fit in with the theme and I was ready to get started.


The construction signs were as simple as can be.  I traced a square and rounded out the edges when I cut them.  Then, used a stencil for the lettering.  I outlined the letters in pencil and then filled them in with a Sharpie marker.  For the figures, I used a ruler to make the straight edges.  I applied the same steps in making the smaller signs for the food at the buffet.


The birthday banner is my favorite decoration to make and it's also simple.  I do it for all the boys' birthdays and save each one. 

I start by tracing out the triangles onto scrapbook paper, making sure its large enough for the letter size.  I then use a stencil to trace the letters onto a coordinating piece of paper, cut them out and glue them to the triangles.  Next, I use a hole puncher to punch a hole in the top corners of the triangle.  Finally, weave ribbon or string through the holes and enjoy!


For some of the snack food, I used a few of our own dump trucks (we've got plenty) as serving bowls.  Super cute!!!

My decoration grand total was $2.98 including a super cute dump truck balloon...Woo Hoo!  This just goes to show that it doesn't take a ton of money or time to have a fantastically decorated birthday party.

Happy celebrating ;)


Sunday, February 9, 2014

DIH Lego Table

Hello everyone!  I hope you had a great weekend.  The boys and I finished up their Lego table this weekend, so I thought it might be nice to share with you!

Last Spring I decided I was going to make my own Lego table instead of buying one of those plastic tables from the store for a few reasons.  First, boys will be boys and will definitely climb on anything in sight.  So, I knew the table needed to be made of wood, not plastic.  Second, with the little plastic tables, kids can be creative and construct one or two buildings, but I thought it would be cool if the kids could make a Lego town.  And third, my kids are still toddlers and sharing the same space isn't always a harmonious experience, so size was definitely going to matter.

I searched and searched and finally found an Ethan Allen wooden coffee table that someone was selling on a yard sale site.  (I'll fill you in about yard sale sites in another post.)  The table was $40 without the glass part, which I assume was broken....I didn't ask because I didn't care.  As soon as I saw the table I knew it would be perfection.

Next, I measured the inside of the table, where the glass used to lay.  Once I had the measurements we headed to Lowe's to pick out a piece of wood and get it cut.  As always, Lowe's cut it for free and there was no headache involved.  I then used screws to join the wood to the bottom of the table for my peace of mind. 

Unfortunately, I didn't take pictures for all of you of the first four steps of this process.  Forgive me?  :)

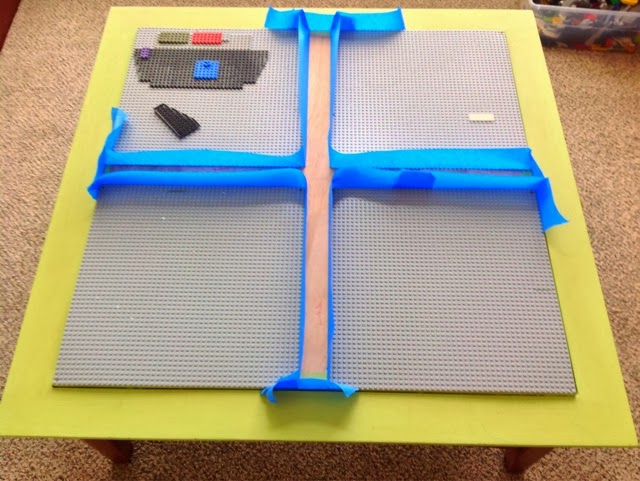
It was easy-peasy from this point forward.  I painted the sides of the table green to simulate grass, headed to Target for four Lego  plates, then nailed them to the top of the wood.  That brings us to the picture below.


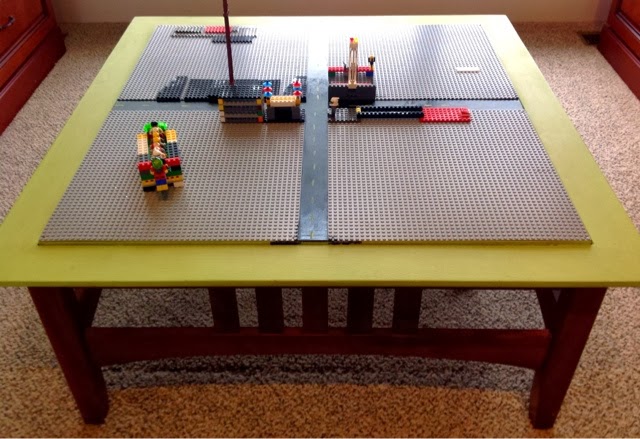
The streets still needed to be created, so I used painter's tape to protect the Lego boards then started spraying away with black, glossy spray paint.  After two coats of the spray paint dried, it was time to paint the yellow lines on the road.  My lines aren't perfect, but my kids don't care.  They love their new Lego table!


In total I spent $120; $40 for the table, $20 for the wood, and $60 for the Lego base plates (those suckers are expensive).  That's very similar pricing to the plastic Lego tables that are sold at stores, except this has at least two times the amount of playing room and it's much more sturdy and durable.  Oh, and another thing I forgot to tell you....my two year old can even use his Duplos on this table!


What do you think of the final product?


Thursday, February 6, 2014

Necktie Organization

Have you ever tried getting wrinkles out of neckties?  No?  It's not fun.  I've burnt so many ties from trying to iron them so I could save paying the dry cleaner $5 per tie just to press them.  Why were my husbands's ties wrinkled, you ask?  Everything was fine until our first son started playing with my husband's electric tie rack.  Every time I opened the closet door there were 50 ties laying on the floor, which would all need hung back up.  We then tried having a tie drawer, which is where the wrinkles come in.  It became increasingly obvious that I needed to find another solution.

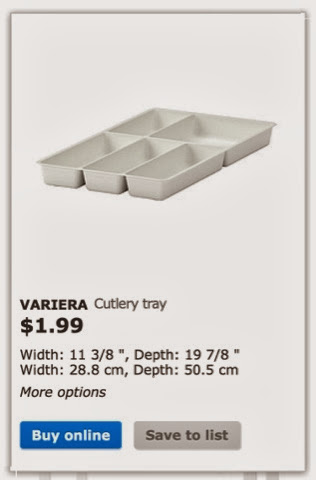
I searched and searched our house for the perfect tie holder.  I was almost desperate enough to put them in a 50 cubby Pottery Barn thing I have that hangs on the wall.  That was too over the top for me so I kept searching through my stash of bins (I'm a bin HOARDER).  Suddenly, the clouds parted and the angels sang!  My Ikea cutlery tray that was never used and has been sitting around would be perfection.  It was $1.99 at Ikea and still is.....ahhh, I love Ikea. 


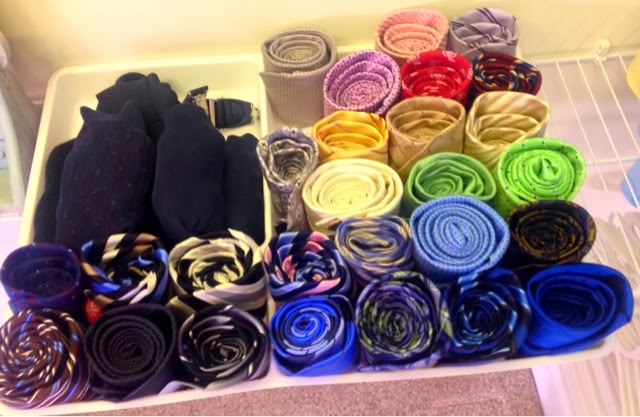
This project was super simple.  (Side note:  If you call every little thing you do around your house a "project", you will feel SO wonderful about yourself at the end of the day!)  I tried to color coordinate the ties, as much as my patience would allow.  Next, I folded them, then rolled them.  Easy!  With the little portion of the tray that was left I put black socks and suspenders, both which are barely ever used.


The great parts about this project (wink, wink) are that all ties are in plain view and not wrinkled, the tray fits perfectly on the closet shelf, and things like black socks, cuff links, and suspenders are all in one place so there's no searching frantically on the morning of the wedding or baptism, or wherever you're going. 

Do you have a system for organizing your husband's neck ties?  Please share. 

Wednesday, February 5, 2014

Our First Giveaway!!


Wanna have some fun?  We're a month in and we already have had a few wonderful representatives from companies we all love offering free products to some lucky winners!  How exciting!


This month's giveaway is big, we're talking valued at over $200 big and it's from.......drumroll please........THIRTY-ONE. You're going to love it!

Okay, so these are the only requests for entering.  ALL three must be completed in order to be considered registered. :)

1) If you haven't already, please "Like" our Facebook page.

2) Find your favorite post and from our timeline then  click "share" to share the post on your Facebook timeline.

3) Invite your friends to like our page. 

We will track everything on our end and enter your name into the drawing. The winner will be notified via Facebook on Valentine's Day.  Good luck, and start liking and sharing. :)

We love you for reading!


Tuesday, February 4, 2014

Little Lovies for the Kiddos

This is just a little something I've been doing for the kiddies every morning since February 1st.  I call them "Lovies" and I write a positive message for each of the boys everyday leading up to Valentine's Day.
 
Nothing too fancy, just a special message or words of encouragement from Mommy and Daddy..."You give warm hugs," "Thank you for sleeping through the night," "You're taking your boo-boo medicine so well!"
 
They love them and look forward to reading them each day.  It brings a smile to their face and gives them something to feel special about.  Who doesn't love that?!?


Monday, February 3, 2014

Super Cute Spice Drawer

Tell me if this has happened to you....  You're making chili and the recipe calls for cumin.  You know you have it, but as you search and search through your mess of a lazy susan or spice cabinet it's nowhere to be found.  The ground beef has already started cooking and you need the cumin now. When you finally find it, there's not enough in the bottle to flavor the meat.  Believe it or not, I think I've figured out the answer for all of us so that the above situation never has to happen again.

Before I went looking for something to buy to solve the problem, I thought about the issues that the spice jar/lazy susan combination is giving me. 

My issues were:

Issue #1:  A tablespoon-sized measuring spoon won't fit into the top of the spice jar, so you have to pour the spice in to the spoon which always leads to a mess.

Issue #2:  The jars become a jumbled mess which then becomes a money waster.  How?  Because you quickly look for a spice, don't see it because everything is messy, buy the spice at the grocery store, then realize you had it the entire time.  Now you have two jars of a spice you may only use twice a year.

Issue #3:  My two year old got in the lazy susan daily and, just to get a reaction out of me....which he always did...., would run around the house pretending he was going to open the lid of the jar and pour out the spice.

Where do we begin?  Dollar Tree, baby!  I needed something that could fit in a drawer so it was out of children's reach, have a larger opening than a spice jar, and not look messy.  I found these cute little colorful containers that came packaged as a 2/$1.  I bought a total of ten two-packs which gave me twenty containers for $10! 


I then put a cutesy label on them (it's cutesy except for my handwriting) and added them to a drawer that was pretty much not being used in a purposeful way.  So, for $10, this is what I'm now working with!


The hearts may be a little over the top for you, I understand, trust me.  I just used what I had to make the labels so that I would have to spend any more money.

What do you think?


Thursday, January 30, 2014

February Goal Setting

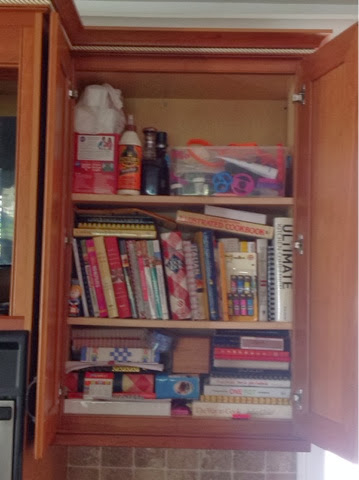
Do you set goals for your household and yourself?  I used to but then stopped after having our second child because my goals would never be reached.  Once I stopped pitying myself because poor old me didn't check everything off my list for the day, I started accomplishing more around my house AND began being happier with my kids.  What is the correlation between accomplishing home goals and my happiness as it relates to my children?  Well, I'm a total Type A personality with a super-sized side of slob. Prior to having kids, getting through a goal list that included twenty items a day was no problem, in fact, it was fun. Once babies came into the picture it was a different story. Accomplishing one goal a day was sometimes, okay...most times, a challenge and I began feeling resentment toward my children. It's pretty embarrassing to admit that and even saying it to you now makes me feel ashamed. However, one day a light bulb went off in my brain and the solution I found was to make my goal list OUR goal  list.

We now begin every morning reading over the goals we made the night before. I then ask for suggestions on how each child feels he can help me so that we reach our daily goals. This tactic is working wonderfully in many ways. The first, it's giving the boys a sense of pride and accomplishment. It's also teaching them to live each day with a plan and a purpose. Lastly, it's bringing us all together in a positive way because when they stay with their task I give them a ton of praise.
 
Here are the items we will base our February goals around.  Of course, I will post updates with the final product for each area listed above. Before I do that, here are pictures of the current state of affairs. 

Take a deep breath........


Cookbooks need purged


Freezer needs help


Craft space and pantry  


Food storage area


Garage - I'm not yet brave enough to show you a picture of my garage because if you were to judge me by my garage you would 100% believe I'm a legit hoarder.  There's a long story to explain why my garage looks messy, but the real story is we live on a three-story townhouse with too many steps for a pregnant woman with two toddlers. Walking down to the garage to clean and organize is the very last thing I want to do. HOWEVER, I WILL CLEAN AND ORGANIZE it this coming month. 

If you feel the way I used to feel regarding not being able to reach goals with kiddies around, I strongly urge you to make an "Our goals list".  Keep me posted on your goals and share some pictures of your final product. 


Wednesday, January 29, 2014

Our Tubby-Time Toy Terrors Are Over!

Do you have a love/hate relationship with bathtub toys like me?  I LOVE them for obvious reasons....they keep the kids happy and quiet (well, at least not fighting) for thirty minutes while I fold laundry while listening to Wendy Williams from afar.  I HATE them because they lay in the tub or all around the bathroom while not in use.

We used to store them under the bathroom sink, but ultimately a child would get out of the tub, sudsy and soaking wet.  Then I would freak because water would be everywhere.  I also tried the laid back approach which was letting all of the toys in the bottom of the tub, but it seemed like every evening someone would get a puncture wound when attempting to get in the tub.  We've had punctured feet, hands, legs, and tooshies.  So, it was obviously time to find a solution that would actually work for us.

By now you may have figured out that my favorite shopping spots are the Target dollar bins and the Dollar Tree.  I always begin with the Dollar Tree because everything is $1.00, and most of the time I buy stuff that is 2/$1.00.  Target's dollar bins are awesome, but it never fails that I walk around and buy other crap.....I mean, wonderful stuff that I'm sure I'll use someday. ;)  For this project I didn't want to spend more than $5.00, so off to the Dollar Tree I went!

The items I would need popped out at me almost immediately.  The bins were 2/$1.00 and I found 10 suction cup hooks in a pack for $1.00!  And, ladies and gentlemen here is my $2.00 solution to a problem I've had for the last four years!!!


This is super easy to do.  Just add a little water to the back of each suction cup, line two up in a straight line, let sit for a while, then attach the lip of the bin to the hooks.

Do you have a tub toy solution that you'd like to share?  We'd love to hear from you!


Check out these wonderful blogs that this post is linked up with.

Remodelaholic
A Bowl Full of Lemons
 

Wednesday, January 22, 2014

A Dark and Cool Place to Call Home

How many of you wonderful people actually have a designated spot for onions and potatoes?  For the past four years (I'm not even joking), upon returning home from the grocery store, I have plopped the bags of onions and potatoes on top of the counter and that was their home until all used up.   It was a gorgeous look. ;)

In an effort to make things pretty AND functional I began searching for the perfect spot. By golly, I found it, and it's perfectly perfect!  We have a cooktop stove with cabinets underneath that held my mixer, oils, toaster, and a toaster oven that takes up a tremendous amount of space and has been used twice in five years.


After finding homes for everything but the mixer, the entire right side of my cabinet was empty and calling longingly to the potatoes and onions.  Next, I had to find something to hold said veggies. Voila!  About a year ago Target had stackable bins on clearance so I bought two for the boys' room, but they just didn't work the way I envisioned. Yep, you know where this is going.....


Doesn't it look so neat, tidy, and functional?!  Onions are on the top because they're used daily, and potatoes are in the bottom bin. The little holes in the bins ensure that the potatoes won't get damp and gross.  This was a huge victory, and the best part is every time I open that cabinet I'm proud of myself.  Lame, but true.


This post is also linked here:
Remodelaholic

Sunday, January 12, 2014

A Little Kid's Dream Day - The PA Railroad Museum!

Hi everyone, all tens of you!  ;)  Last week I took my boys on our monthly trip to the Pennsylvania Railroad Museum in Strasburg, Lancaster County.  If you haven't taken your kids there yet you have to do it.  You're thinking...."Trains, Emily?  Trains?  BORING!".  It's honestly not boring at all, this place is awesome for kids, and when our kids are happy, we're happy!  It's totally cheap, you can spend all day there for one fee, and when the weather is nice visitors are free to have lunch at one of their picnic tables overlooking a picturesque farm. 


Upon entering the main hall of the museum, you'll be shocked by the size of the retired and beautifully restored trains. 


Another highlight is the old-fashioned train station, including an office with a telegraph station, and the main street of a little town they've reproduced.  If you like history you'll love it (even if you're not a fan of history, you'll still think it's cool).


Every time we get to the museum my boys run right for Stewart Junction, which is the kid's "building".  Stewart Junction is a hands-on area that includes a model train set with a huge town, a lego table with a motorized lego train town layout, Thomas and Geotrax tables with fun layouts, and tons of educational stuff.


You're probably wondering where the pictures of the trains are in this post.  Here are a few, including the inside of a boxcar that smelled like the inside of my great-grandfather's shed....it was wonderfully nostalgic.


Of course, the highlight of every visit for my boys is pretending to be the firemen and shoveling the coal into the firebox.


Finally, this is just a super cute picture of Peter Pan gazing at a model train while Captain Hook takes a picture with his big boy camera.


If you've never visited the railroad museum, I highly suggest taking your kids and making a day of it.  The Strasburg Railroad is directly across the street also.  Just a tip, if you'll be visiting the museum and riding the train, be sure to buy a combo ticket which will save you some loot.  :)

Have fun!!